Elasticsearch Snapshot & Restore 101
Local, S3 Bucket and NFS Drive

ElasticSearch or even Elastic as a whole, has a great detail documentation on performing a snapshot and restoring the backup. However in order to a simple snapshot; especially for the beginner it may be overwhelming.
In the below steps, I aim to achieve a simple snapshot and restore from Local directory.
Steps:
- Define the index, and populate data in the index
- Create Repository
- Define Snapshot Policy
- Run the snapshot
- Query Snapshots using DevTools
- Restoring the Snapshot
Define the index, and populate data in the index
Ensure the Elasticsearch and Kibana is started. All the below commands are ran under DevTools of Kibana you can route using below URL:
http://localhost:5601/app/kibana#/dev_tools/console
Lets run the below command in to create a index:
PUT /elastic_snapshot_demo
Lets also add some data,
POST /_bulk
{ "index" : { "_index" : "elastic_snapshot_demo"}}
{  "message": "Some data added to the list",  "user": {    "id": "Smit"  }}
{ "index" : { "_index" : "elastic_snapshot_demo"}}
{  "message": "Some data 2 added to the list",  "user": {    "id": "Steven"  }}
{ "index" : { "_index" : "elastic_snapshot_demo"}}
{  "message": "Some data 3 added to the list",  "user": {    "id": "Lia"  }}
Once the data is added, we can search the index to validate:
GET /elastic_snapshot_demo/_search
It will be return all the data that we just added.
Create Repository
For more detail information about the repository, you may read more here
Before we could run a repository creation command, we need to append the path.repo in the elasticsearch.yml
path:
  repo:
    - /Users/Smit/Documents/Dev/ELK/elasticsearch-7.8.0/mount/backups
Here the path needs to be your local machine. For me it is under Documents > Dev > ELK > elasticsearch-7.8.0 I have created a folder mount and backups under mount
Before you restart the elasticsearch, ensure the folder mount and backups both has correct permissions for elasticsearch to write to the folder.
For Unix, you can use the below command to provide required permissions
chmod o+rx /Users/Smit/Documents/Dev/ELK/elasticsearch-7.8.0/mount
Once this setup, lets start the elasticsearch and run the following command in the devTools in Kibana to register the Snapshot registry:
PUT /_snapshot/elastic_snapshot_demo_fs_backup
{
  "type": "fs",
  "settings": {
    "location": "/Users/Smit/Documents/Dev/ELK/elasticsearch-7.8.0/mount/backups/elastic_snapshot_demo_fs_backup",
    "compress": true
  }
}
Here the name elastic_snapshot_demo_fs_backup can be customised, based on the requirements.
After running, the response should look similar to below:
{
  "acknowledged" : true
}
In order to also check if it was successful, you can go below URL to check if the Repository is registered successfully:
http://localhost:5601/app/kibana#/management/elasticsearch/snapshot_restore/repositories

Define Snapshot Policy
Lets add the policy, for that lets navigate to
http://localhost:5601/app/kibana#/management/elasticsearch/snapshot_restore/add_policy
Lets add the following values:
Policy name: daily-elastic_snapshot_demo-snapshot
Snapshot name: <daily-snap-{now/d}>
Repository: elastic_snapshot_demo_fs_backup
Schedule: 0 0 0 ?
For the Policy Name, it needs to be unique, and best to have it in-line with the index that you are planning on backing up.
For Snapshot Name, please note of the angular brackets < >, those are required if you are planning on adding expression
For Repository, select the repository we created in the previous step.
For the schedule, Please note it is UTC time. So In the above express, it states it will run this policy every 12th hour in the morning i.e. 00:00

Once all the values are created, lets go Next
For the Indices section, un-toggle and unselect all the indices (if you have any)
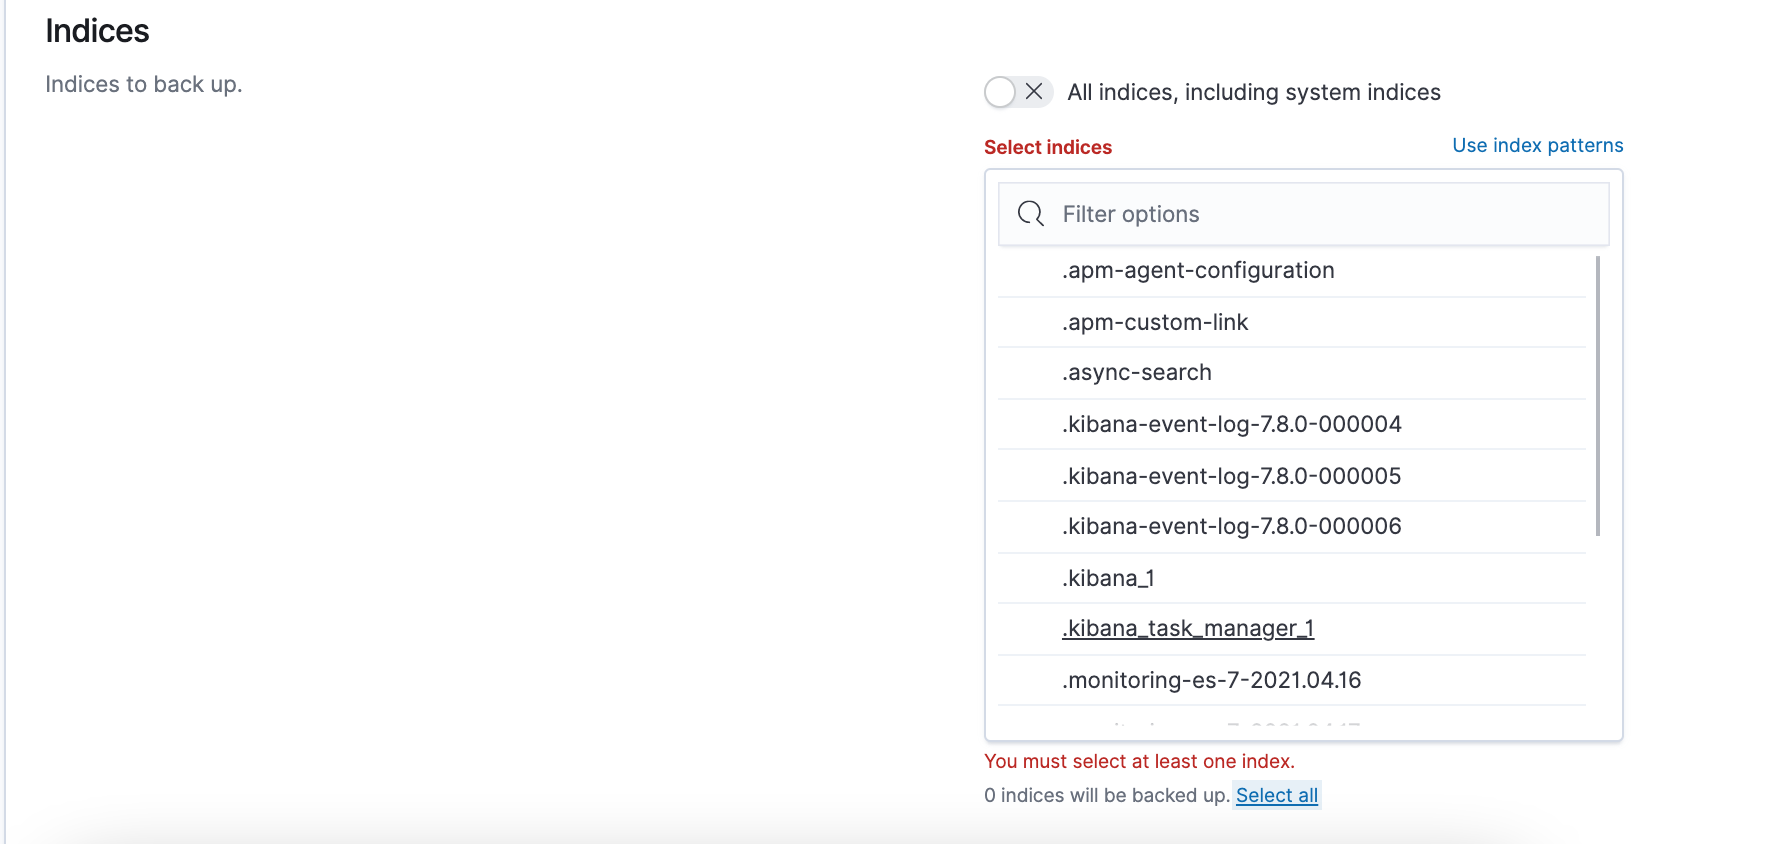
Once done, select just the index you wish to snapshot:

Once done, rest leave it as default and move on to the next stage.
For the Snapshot retention, leave it as default as well, move on to the review stage:
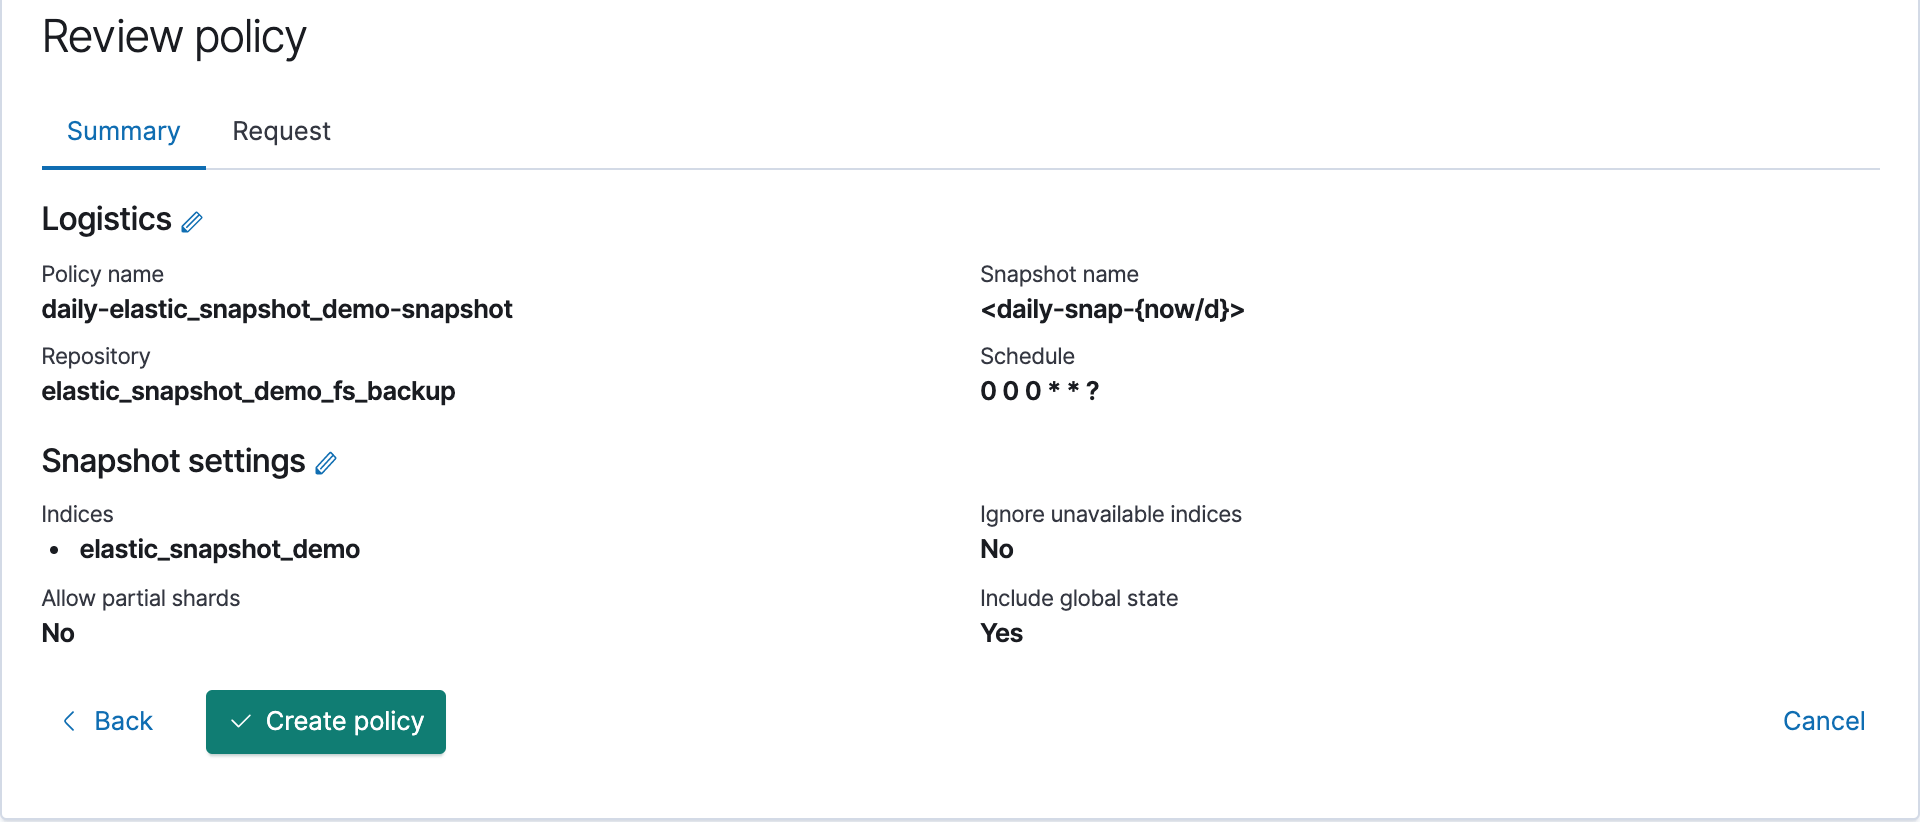
Once all values are correctly verified, lets click create policy, once completed it should be show similar to the below screenshot:

Run the snapshot
As stated in the previous step, the policy will run every 24hr, but to test the policy you may run the policy ad-hoc as well.
In order to run ad-hoc, you can click on the play icon, as shown in the below:

It will take sometime for the snapshot to be created, especially if it is running for the first time.
After a while you can view your backups folder, you will see the snapshot folder is created:

That's all, you have finally created your very first snapshot of an index.
Query Snapshots using DevTools
Run the below command, to see all the snapshots you have
GET /_snapshot/_all
Restoring the Snapshot
For restore, we need to delete the index first to simulate the restore
DELETE /elastic_snapshot_demo
Once deleted, you can run the search command again, and it should return 404
GET /elastic_snapshot_demo/_search
Restoring can also be done using two methods, first is using the devTools, and another is using the Kibana Restore view
Using the Kibana DevTools
Run the following command
POST /_snapshot/elastic_snapshot_demo_fs_backup/daily-snap-2021.04.17-bkpbzxtjrfoywdu_bmqkkg/_restore
In the command there are few things you may have update
first is elastic_snapshot_demo_fs_backup is the name of the repository we created earlier,
secondly daily-snap-2021.04.17-bkpbzxtjrfoywdu_bmqkkg is the name created when the snapshot was created.
If this is hard to replicate, you can simply use the second method.
Using the Kibana Snapshot and Restore section
Select the restore icon for the snapshot that you would like to restore:
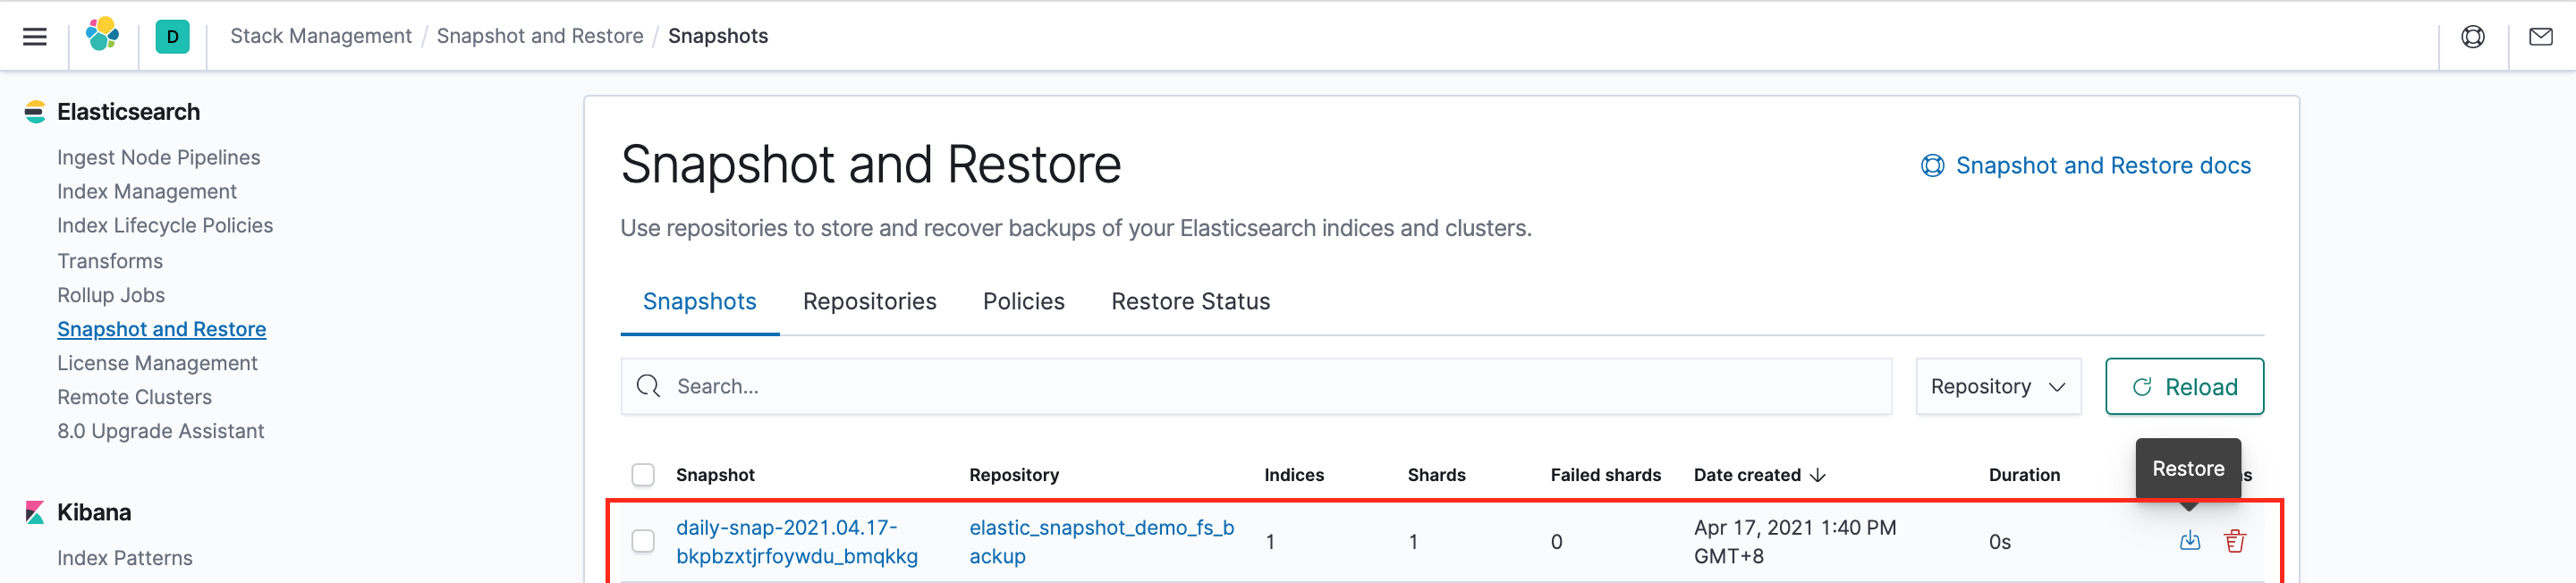
Once selected, it will prompt for few actions, simply select next, next and Restore Snapshot
Thats all needed to restore.
You can now run the command to query the same index, and see if the data is correctly restored:
GET /elastic_snapshot_demo/_search
The result of the above command to return three set of data under hits.
Thank you for reading, if you have any suggestions or improvements feel free to reach out to me.
If you liked, please share and like the article.
Part 2: https://shahsmit.hashnode.dev/elasticsearch-snapshot-and-restore-in-aws-s3
Part 3: https://shahsmit.hashnode.dev/migrating-from-older-version-of-elastic-to-newer-version-using-aws-s3
PS: Next series of articles will include, Snapshotting at S3, migrating to a newer version of elasticsearch etc.